A Taste of Docker
Preface
Well, preparing for the future, learning how to play with docker early.
Gonna crush them
What is Docker?
Regular virtual machines require installing an entire operating system, which consumes a lot of resources from our computer. Docker only simulates the runtime environment needed by the project, with very low resource usage — this can greatly improve development efficiency.
It can simulate software environments according to our needs, quickly deploy project instances we’ve developed (like Mastodon), and to some extent provides environment isolation — the runtime environment is separated from the operating system, and multiple containers can run simultaneously.
We can also package containers into images for repeated use.
Like this whale carrying containers, wherever it swims — it’s ready to use out of the box.

How to Install Docker
Installing Docker on various platforms is very easy.
The Linux platform might be a bit harder for beginners, but for experienced users, installing Docker on Linux is very fast.
Just install it directly from your distribution’s package manager.
Arch
For example, on Arch we can have pacman bring this whale home.
sudo pacman -S dockerIf you get the following error when running:
docker: Cannot connect to the Docker daemon at unix:///var/run/docker.sock. Is the docker daemon running?.
See 'docker run --help'.
Please use systemctl to start the docker system service:
sudo systemctl start dockerIf necessary, enable it to start on boot:
sudo systemctl enable dockerDebian
If you’re using a Debian-based distribution, you can refer to the official documentation to install using apt.
Set up the Repository
- Update the apt repository and install some dependencies to allow apt to use third-party repositories over HTTPS.
sudo apt updatesudo apt install ca-certificates curl gnupg lsb-release- Add Docker’s official GPG key:
sudo mkdir -p /etc/apt/keyringscurl -fsSL https://download.docker.com/linux/debian/gpg | sudo gpg --dearmor -o /etc/apt/keyrings/docker.gpg- Set up the Docker repository:
echo \
  "deb [arch=$(dpkg --print-architecture) signed-by=/etc/apt/keyrings/docker.gpg] https://download.docker.com/linux/debian \
  $(lsb_release -cs) stable" | sudo tee /etc/apt/sources.list.d/docker.list > /dev/null
Install Docker
- Update the package repository:
sudo apt updateIf you encounter a GPG error during the update, refer to this official note:
Your default umask may be incorrectly configured, preventing detection of the repository public key file. Try granting read permission for the Docker public key file before updating the package index:
 $ sudo chmod a+r /etc/apt/keyrings/docker.gpg

$ sudo apt-get update- Install Docker Engine, containerd, and Docker Compose:
sudo apt install docker-ce docker-ce-cli containerd.io docker-compose-plugin- Verify Docker is installed correctly by running the hello-world image:
sudo docker run hello-worldRPM-based Systems
To be honest, I don’t particularly like these distributions. Taking CentOS as an example, CentOS 7 and above can also be installed directly using yum.
Set up the Repository
Same as above — set up a third-party repository.
But first, install yum-utils to use yum-config-manager:
sudo yum install -y yum-utilsThen set up the repository:
sudo yum-config-manager \
    --add-repo \
    https://download.docker.com/linux/centos/docker-ce.repo
Install
Install Docker packages and dependencies using yum:
sudo yum install docker-ce docker-ce-cli containerd.io docker-compose-pluginOne More Thing for Linux Platforms
The methods above install the latest version of Docker on Linux platforms. If you need to install a specific version, refer to the official Docker documentation.
Windows
On Windows, you can directly install Docker Desktop. It’s very simple — just download the installer from the official Docker documentation.
What Can I Do with Docker?
Docker can do a lot of things.
The most common use is running applications in Docker containers.
HelloWorld
For example, let’s run a Hello World:
sudo docker run ubuntu /bin/echo "hello world"As you can see, it outputs a series of characters, and finally prints “hello world”.

Let me explain the meaning of this command:
docker— runs the Docker binary file, nothing specialrun— runs a containerubuntu— the image name to run/bin/echo "hello world"— the command to execute inside the container
If you see the following message, it means the relevant image hasn’t been downloaded yet when starting the container:
Unable to find image 'ubuntu:latest' locally
latest: Pulling from library/ubuntu
e96e057aae67: Pull complete
By default, Docker will download it automatically, but it’s a good habit to download the image before starting it:
sudo docker pull ubuntuInteractive Containers
Of course, we can also create an interactive container, meaning we can control it with bash:
sudo docker run -i -t ubuntu /bin/bash-i: Interactive operation.-t: Terminal.
After creating the container this way, our shell becomes the container’s shell:
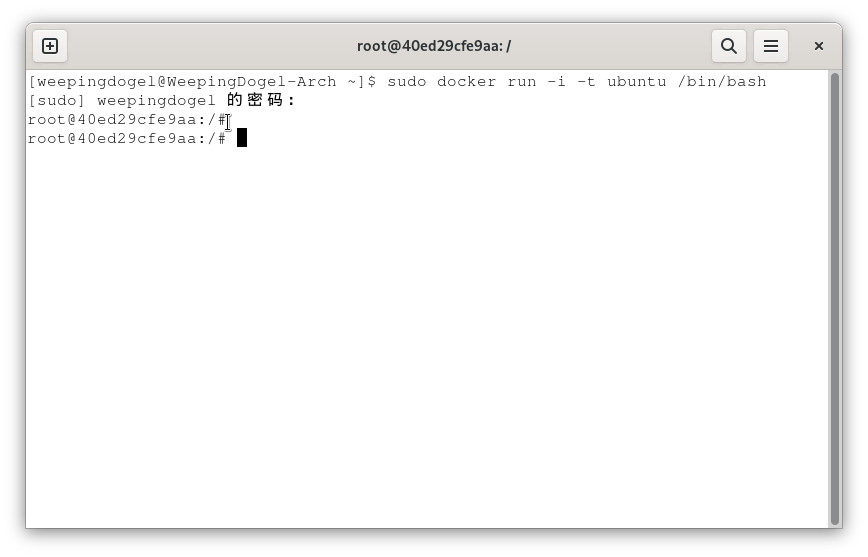
We can run some commands on it:
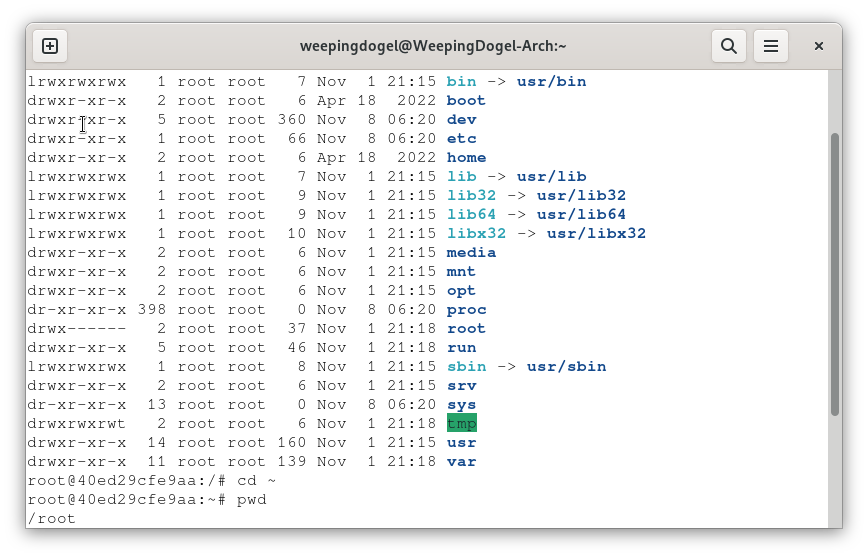
The commands we execute won’t affect the host system.
We can use the exit command to exit:

When you exit, the container stops running because it wasn’t started in daemon mode.
Running Containers in Daemon Mode
Next, I want to explain why exiting the container shell with exit isn’t the end of the story.
This time, let’s start another container, but add the -d parameter.
This parameter means running in Daemon mode. So what does Daemon mean?
Search engine answers usually say something like “system daemon process” etc. Basically, it’s similar to running in the background.
Let’s start a container with this command:
sudo docker run -i -t -d ubuntu /bin/bash
This time, we don’t get a shell, but a string of characters.
Let’s use Docker’s ps command to view running containers:
sudo docker psWe get this result:

Image might not be clear? Let me paste it here:
[weepingdogel@WeepingDogel-Arch ~]$ sudo docker ps
CONTAINER ID   IMAGE     COMMAND       CREATED              STATUS              PORTS     NAMES
2f4976200305   ubuntu    "/bin/bash"   About a minute ago   Up About a minute             funny_pare
We can see that the container ID in the result is only the first part of the returned string — this is what we’ll use as the container ID.
How do we control its shell?
Time to learn some new Docker commands:
- attach
- exec
exec needs the -i and -t parameters along with a command, like /bin/bash.
So the format is:
sudo docker exec -it containerID commandThen we need to run bash:
sudo docker exec -it 2f4976200305 /bin/bashWe quickly enter the container’s shell:

We can use cat /etc/os-release to check system info:
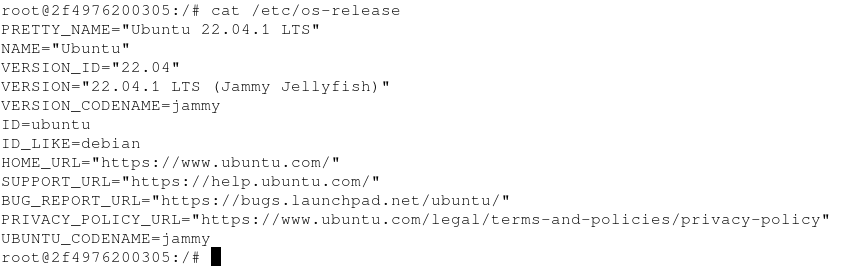
We can clearly see that the result above shows Ubuntu while I’m using Arch, confirming that things inside the container don’t affect the host OS.
Not clear? Let me show you more clearly:
PRETTY_NAME="Ubuntu 22.04.1 LTS"
NAME="Ubuntu"
VERSION_ID="22.04"
VERSION="22.04.1 LTS (Jammy Jellyfish)"
VERSION_CODENAME=jammy
ID=ubuntu
ID_LIKE=debian
HOME_URL="https://www.ubuntu.com/"
SUPPORT_URL="https://help.ubuntu.com/"
BUG_REPORT_URL="https://bugs.launchpad.net/ubuntu/"
PRIVACY_POLICY_URL="https://www.ubuntu.com/legal/terms-and-policies/privacy-policy"
UBUNTU_CODENAME=jammy
Exiting is still done with exit, but this time exit only exits bash — it doesn’t stop the container.
Run docker ps and you’ll see it’s still running:

Now let’s try attach:
Its usage is:
sudo docker attach containerIDSo I need to run:
sudo docker attach 2f4976200305
This also gives us a shell, but if we run exit, the container will be stopped.
Let’s try?
Clearly, after exit is executed, docker ps doesn’t show the running container ID — this means the container has stopped.

If we need to restart this container, we can use the start or restart command:
sudo docker restart 2f4976200305Now docker ps will show it running again.
Use docker ps -a to view all containers, regardless of whether they are running:
sudo docker ps -a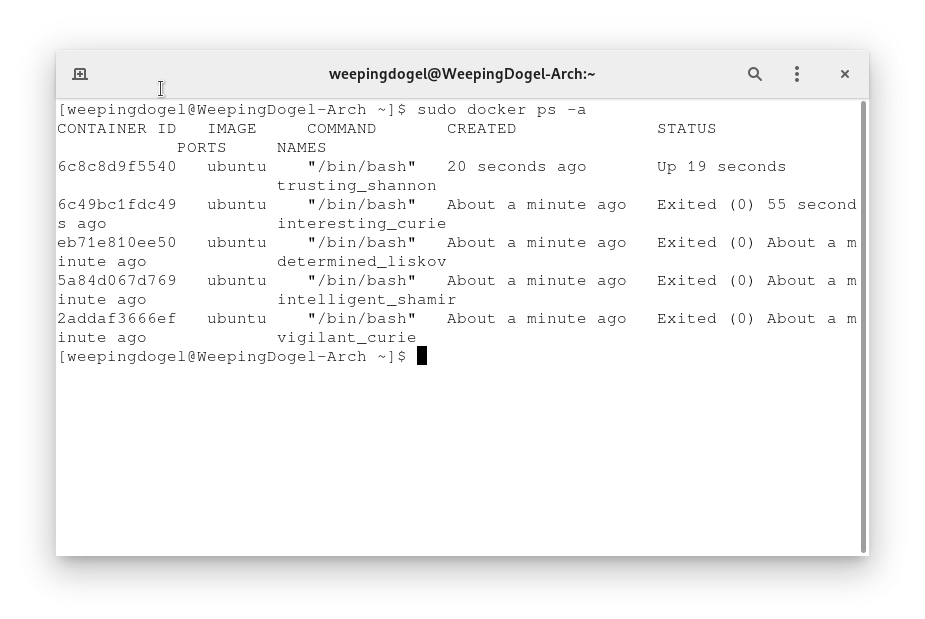
Deleting Containers
What if we don’t need these containers anymore?
Like if we broke them and need to delete them
Then use the docker rm command:
sudo docker rm containerIDJust append the container ID to delete. You can delete multiple at once:
sudo docker rm 6c8c8d9f5540 6c49bc1fdc49 eb71e810ee50 5a84d067d769 2addaf3666efThen check with docker ps -a — no container IDs will be shown:

Images
The prerequisite for running a Docker container is having the corresponding image.
Use docker images to view locally available images. If you need other images, use docker pull to get them:
sudo docker images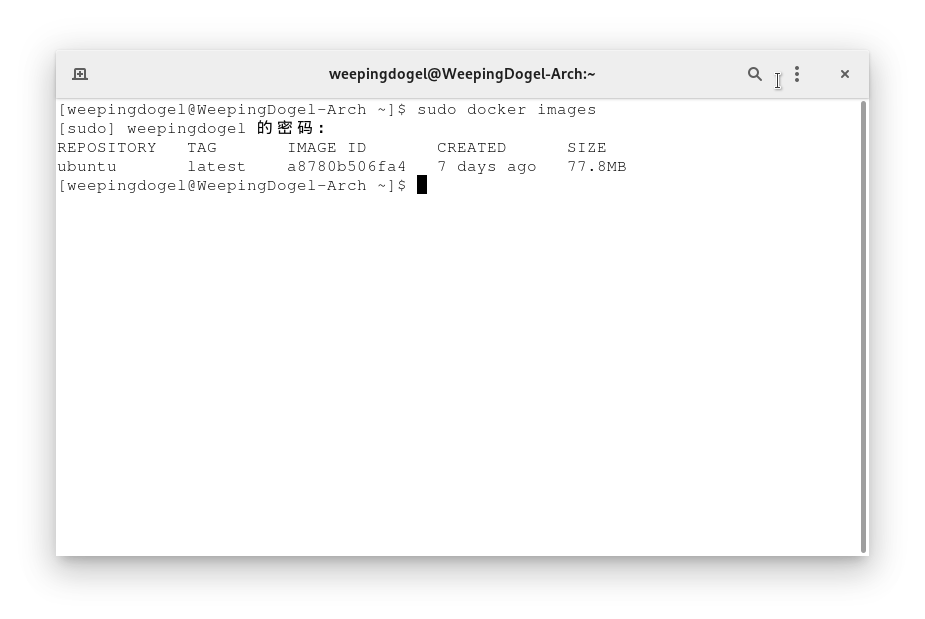
Let’s get the PHP image:
sudo docker pull php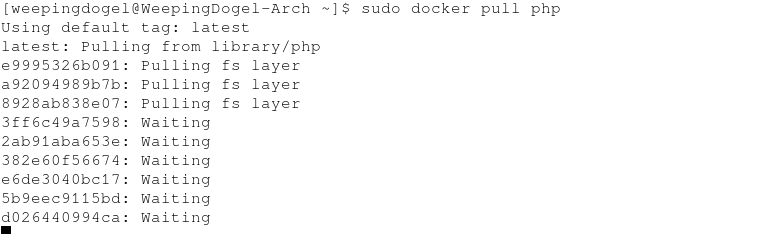
Wait for the automatic download to complete, then the image is ready to use.
If you don’t pull the image before running the container, Docker will pull it temporarily when you run it.
After the download is complete, let’s check the existing images:
sudo docker imagesREPOSITORY TAG IMAGE ID CREATED SIZE
ubuntu latest a8780b506fa4 7 days ago 77.8MB
php latest 30e567f030d3 12 days ago 484MB
httpd latest fe8735c23ec5 2 weeks ago 145MB- REPOSITORY: The image repository source
- TAG: The image tag
- IMAGE ID: The image ID
- CREATED: The image creation time
- SIZE: The image size
The same repository source can have multiple TAGs representing different versions. For example, the ubuntu repository has versions like 15.10, 14.04, etc. We use REPOSITORY:TAG to define different images.
Deleting Images
Of course, unwanted images can also be deleted:
sudo docker rmi imageID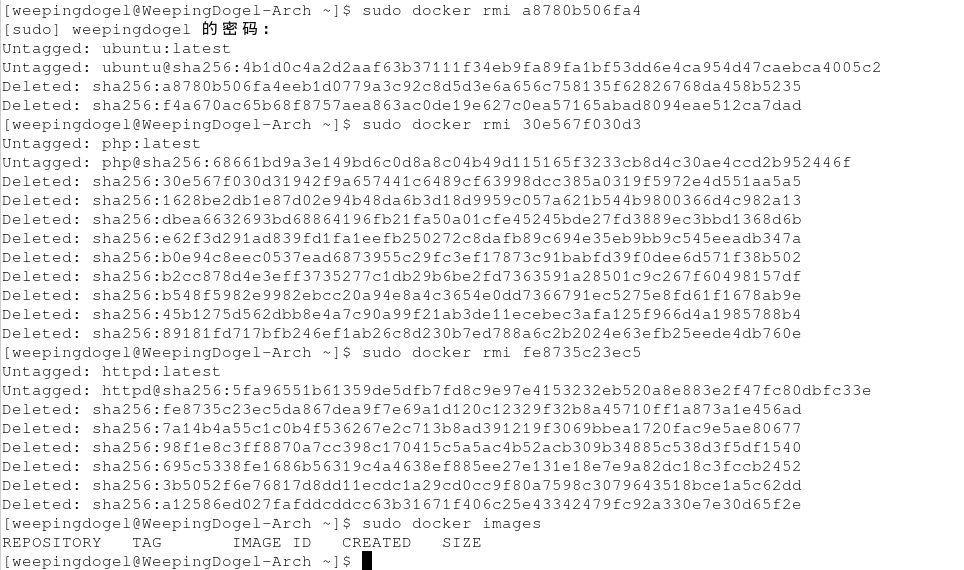
As shown, the unwanted image is deleted.
Dockerfile
What is a Dockerfile? A Dockerfile is a text file used to build images. It contains a series of instructions and explanations, similar to shell scripts (like PKGBUILD).
A simple Dockerfile looks like this:
FROM nginx
RUN echo 'Hello World!' > /usr/share/nginx/html/index.htmlFROM: Custom images are all based on the FROM image. Here, nginx is the base image for customization. All subsequent operations are based on nginx.RUN: Used to execute the command that follows. There are two formats:
Shell format:
RUN <command>
# <command> is equivalent to the shell command run in the terminal.
Exec format:
RUN ["executable", "param1", "param2"]If you’re familiar with Linux operations, picking this up is easy. But it’s worth noting what the tutorial says:
Each instruction in a Dockerfile creates a new layer in Docker. So too many meaningless layers will cause the image to bloat. For example:
FROM centos
RUN yum -y install wget
RUN wget -O redis.tar.gz "http://download.redis.io/releases/redis-5.0.3.tar.gz"
RUN tar -xvf redis.tar.gz
The above creates 3 layers. It can be simplified to:
FROM centos
RUN yum -y install wget \
    && wget -O redis.tar.gz "http://download.redis.io/releases/redis-5.0.3.tar.gz" \
    && tar -xvf redis.tar.gz
That means we should try to write parallel statements in RUN command scripts.
A Simple Web Server
Now I want to try running a simple webpage with Docker.
Let me run that login page I wrote when I was bored.
First, create a directory:
mkdir webtestCopy the static frontend files into it:
cp test/* webtest/ -rvThen enter the directory:
cd webtestCheck the files:
ls -lhTotal 4.0K
drwxr-xr-x 2 weepingdogel weepingdogel 23 Nov 10 21:30 css
drwxr-xr-x 2 weepingdogel weepingdogel 6 Nov 10 21:30 img
-rw-r--r-- 1 weepingdogel weepingdogel 1.4K Nov 10 21:30 index.html
drwxr-xr-x 2 weepingdogel weepingdogel 21 Nov 10 21:30 jsOK, now let’s write a Dockerfile:
FROM nginx
COPY ./index.html /usr/share/nginx/html/index.html
COPY ./css/style.css /usr/share/nginx/html/css/style.css
COPY ./js/main.js /usr/share/nginx/html/js/main.js- COPY
Copies files or directories from the context directory to a specified path in the container.
Format:
COPY [--chown=<user>:<group>] <source_path>...  <target_path>
COPY [--chown=<user>:<group>] ["<source_path>",... "<target_path>"][--chown=<user>:<group>]: Optional parameter to change the owner and group of files copied into the container.
<source_path>: Source file or directory, can use wildcards that follow Go’s filepath.Match rules.
<target_path>: The specified path inside the container — it doesn’t need to exist beforehand; it will be created automatically.
My approach is the same as normal setup — install nginx and then copy the static files to the web root. But with Docker, the efficiency is much higher.
Without Docker, I’d have to spend at least half an hour configuring a virtual machine, setting up software sources, installing nginx, etc. With Docker, I just need to write a script for one-click deployment, and I can save it as an image to share with others — a one-time effort for long-term gain!
Alright, enough talk — let’s build the image.
Use the docker build command to build an image from the dockerfile in the directory.
The -t attribute value refers to <image_name:image_tag>:
sudo docker build -t webtest:latest .Note the . at the end — this is called the context path, and it refers to the relative path.
docker build command packages all content under this path.Now let’s check the image list:
sudo docker images
Clearly, we can see the image we just created, with image ID 9acd8c30bd5b.
Now let’s deploy it to a container! Use -p to specify port binding — <external_port:internal_port>:
sudo docker run -p 8080:80 -d 9acd8c30bd5bNow we’ve mapped the container’s port 80 to the host’s port 8080.
Then access our local IP + 8080 to reach that page. I’ll use 127.0.0.1:8080:

Successfully accessed!
And just like that, quickly deploying nginx is done!
Conclusion
After this initial learning and experience with Docker, I’ve gotten a taste of its high efficiency and convenience. I’ve gained quite a bit.
But I’m still at an entry-level stage — there are many more advanced applications waiting to be explored.
Eh? Are you asking if it’s difficult? QwQ ~
For those familiar with Linux, it shouldn’t take more than a few days to get the hang of it. But deep understanding will still take time.
That’s all for now.