Installing Gentoo on a Laptop via rsync

Preface
Long time no see, I’ve missed you all~
I have a ChromeBook with terribly weak performance.
With 2GB of RAM and a dual-core old low-voltage CPU running at only 2.6 GHz, it’s completely insufficient for today’s popular distributions. Even running Mint frequently hits 100% CPU usage.
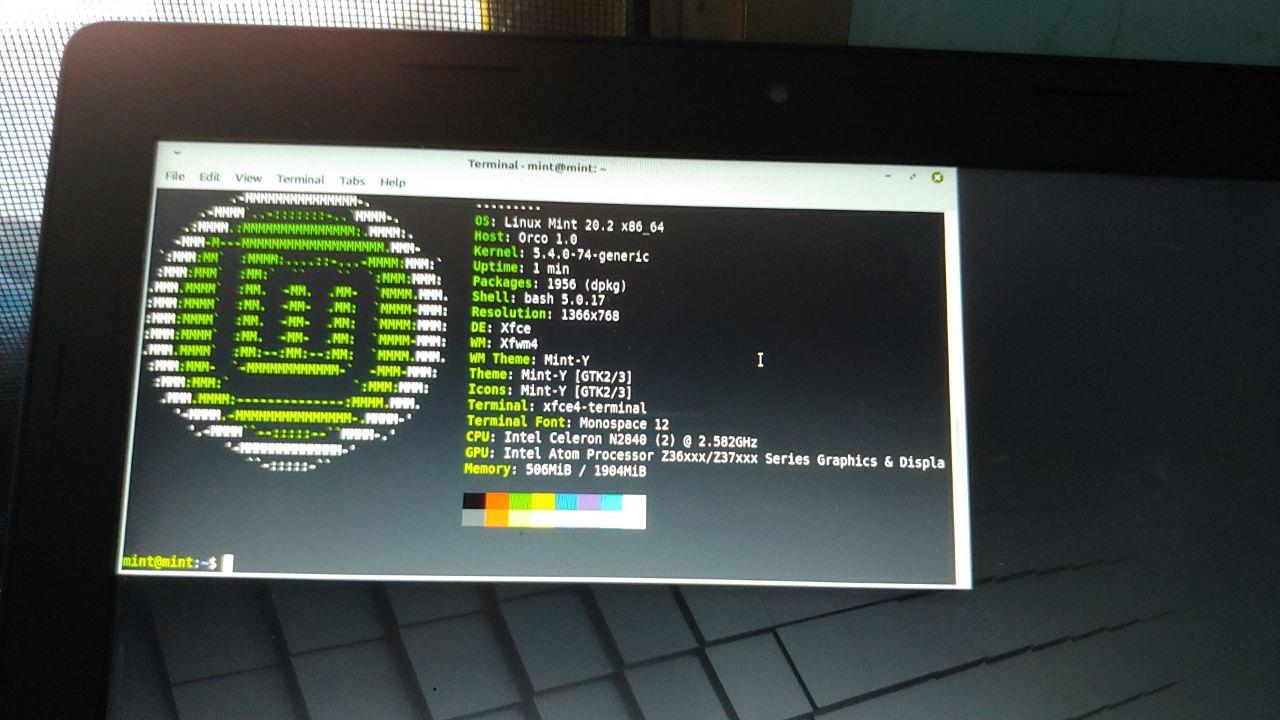
So I wondered—could I install Gentoo on it?
But with this turtle of a CPU, it’d probably take a week of continuous uptime just to compile everything…
Well, I thought I’d try compiling Gentoo on my desktop and then transferring it to the ChromeBook via rsync.
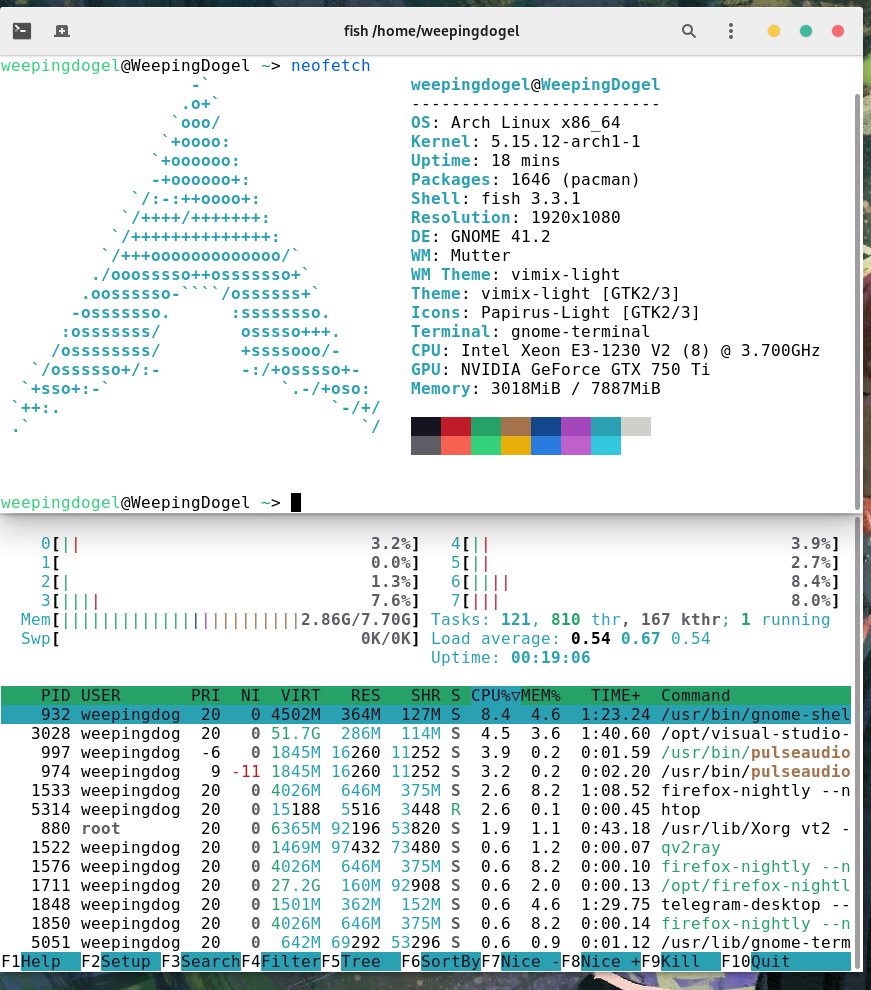
When it comes to compilation, I feel like even in 2022, the E3 powerhouse won’t let me down.
At least it’s much faster than this little Celeron.
Preparation
Enough rambling, let’s get started.
But we need to prepare these things:
- Gentoo Wiki
- You’ll need the official guides and documentation during installation—essential.
- Translation tools
- Since the Gentoo user base is relatively small, the documentation may not be fully translated. I recommend DeepL.
- A USB drive
- Used to boot a temporary Linux system as the rsync receiver on the laptop.
- Nothing special, preferably supporting USB 3.0~
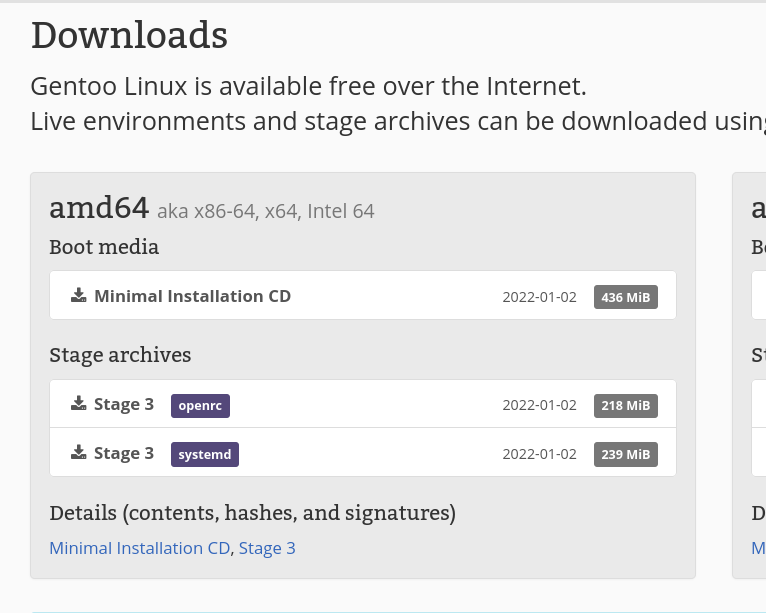
- Download the official Gentoo stage tarball
- I’ll detail this process below.
- A Linux terminal you can operate
Download the Stage Tarball
Since our installation method is a bit special, we can jump directly to this step in the official wiki.
Following the official wiki documentation, let’s proceed:
First, become root:
weepingdogel $ sudo -iNext, you can mount a partition to /mnt or just create a folder. I have plenty of space, so I’ll just work directly.
As for how to mount it? Refer to the Arch Wiki.
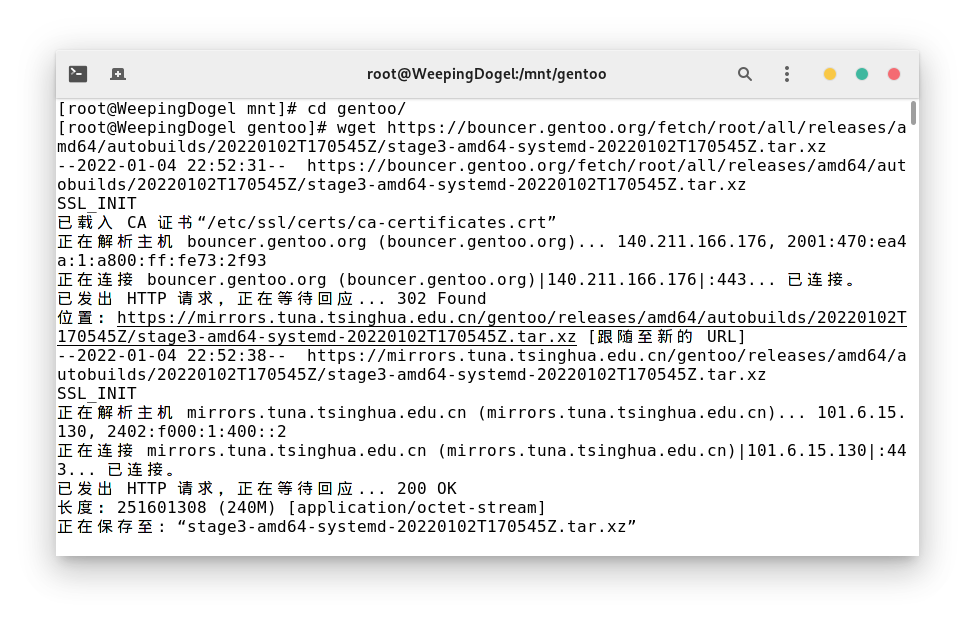
root # cd /mnt/gentooThen we need to download the stage tarball with wget. Open this page. Here we’ll choose stage3.
Since I’m lazy and prefer systemd, you can choose according to your needs.
Note: Right-click stage3 systemd and copy the link.
Paste the link into the terminal:
root # wget https://bouncer.gentoo.org/fetch/root/all/releases/amd64/autobuilds/20220605T170549Z/stage3-amd64-systemd-20220605T170549Z.tar.xzWait for the download.
After downloading, you can verify the file. Refer to the official documentation.
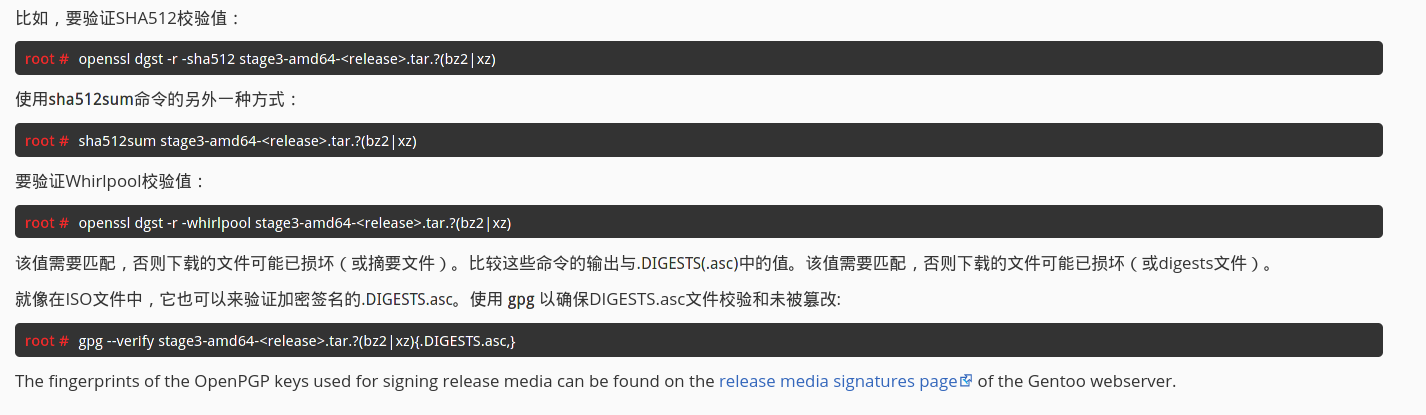
Generally, file corruption doesn’t happen on my end, so I won’t elaborate. Let’s move on to extracting the stage file.
Extract the Stage Tarball
We’ll use tar to extract it. Here’s the official wiki command:
root # tar xpvf stage3-*.tar.bz2 --xattrs-include='*.*' --numeric-ownerSome readers might not understand the wildcard in the middle—it’s just a glob pattern. But it might not match your downloaded file exactly, so let’s change it to the exact filename.
This is simple—just press the Tab key.
root # tar xpvf stage3-amd64-systemd-20220102T170545Z.tar.xz --xattrs-include='*.*' --numeric-ownerWait for extraction, it’ll be done in a moment. Unless you’re using an IDE hard drive.
Configure Compilation Options
The official documentation explains this step as follows:
To optimize Gentoo, you can set some variables that affect Portage, Gentoo’s officially supported package manager. All these variables can be set as environment variables (using export), but this isn’t permanent. To keep the settings, Portage reads the
/etc/portage/make.conffile, a configuration file for Portage.A commented list of all possible variables can be found in
/mnt/gentoo/usr/share/portage/config/make.conf.example. To successfully install Gentoo, only the variables mentioned below need to be set.Start an editor (in this guide, we’ll use nano) to change the optimization variables we’ll discuss below.
root # nano -w /mnt/gentoo/etc/portage/make.confFrom the make.conf.example file, the structure is obvious: comment lines start with “#”, and other lines define variables using the VARIABLE=“content” syntax. We’ll discuss a few of them next.
Here, I’ll use vim:
root # vim /mnt/gentoo/etc/portage/make.confAdd the -march=silvermont option to COMMON_FLAGS=, so the compiler can optimize for the Silvermont architecture’s garbage CPU.
The complete file looks like this:
# These settings were set by the catalyst build script that automatically
# built this stage.
# Please consult /usr/share/portage/config/make.conf.example for a more
# detailed example.
COMMON_FLAGS="-march=silvermont -O2 -pipe"
CFLAGS="${COMMON_FLAGS}"
CXXFLAGS="${COMMON_FLAGS}"
FCFLAGS="${COMMON_FLAGS}"
FFLAGS="${COMMON_FLAGS}"

# NOTE: This stage was built with the bindist Use flag enabled
PORTDIR="/var/db/repos/gentoo"
DISTDIR="/var/cache/distfiles"
PKGDIR="/var/cache/binpkgs"

# This sets the language of build output to English.
# Please keep this setting intact when reporting bugs.
LC_MESSAGES=C
Install the Gentoo Base System
We’ve completed the first phase. Now we can start installing the base system, ehehe.
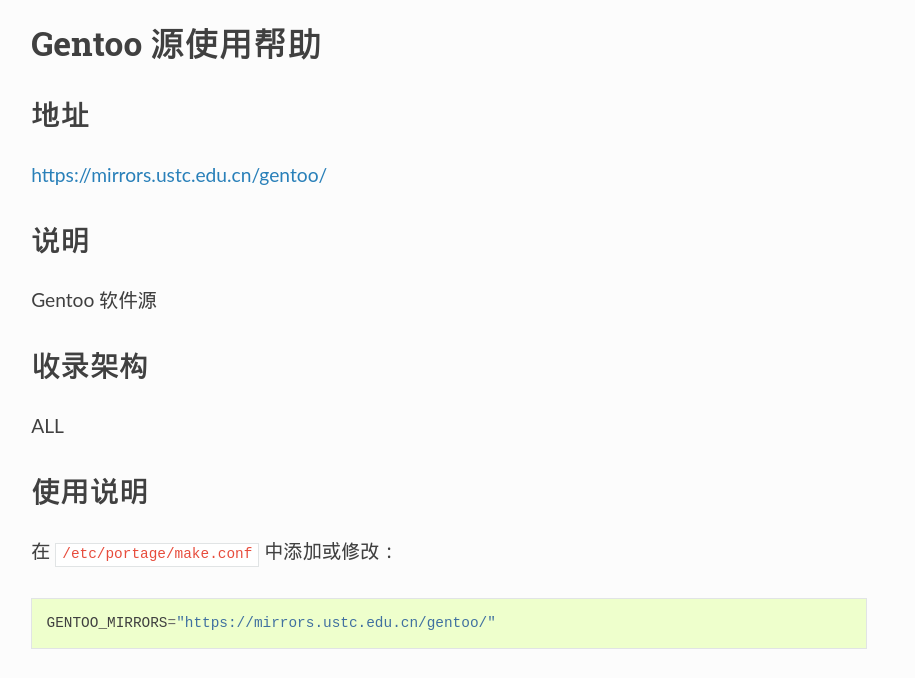
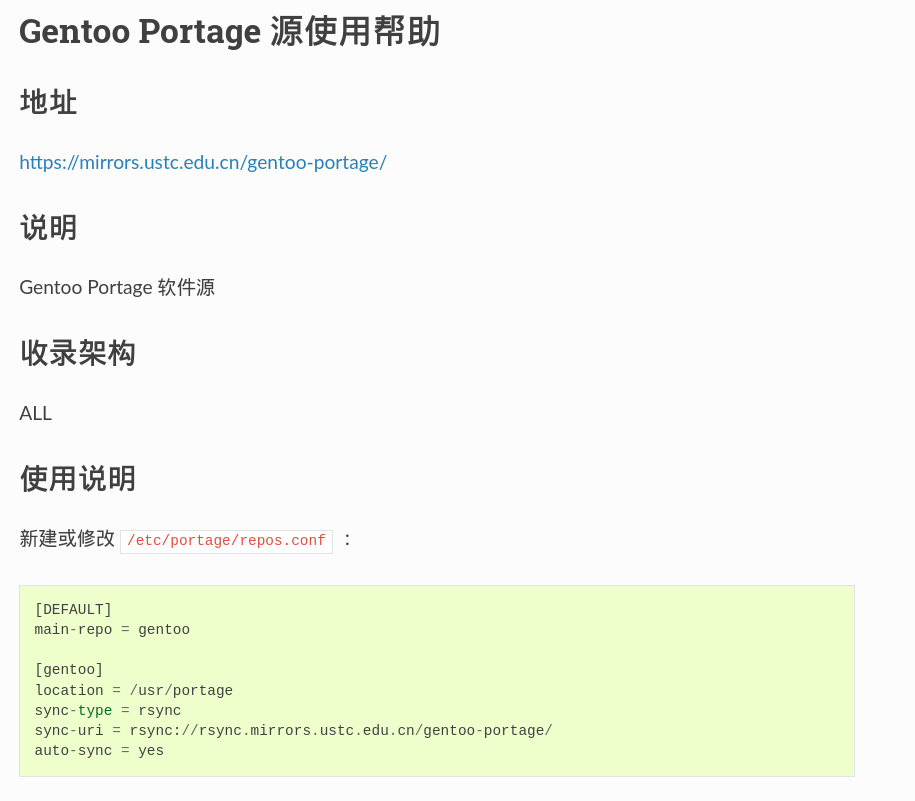
Next, we need to select a mirror. We can refer to the USTC mirror’s help documentation:
- Gentoo Mirror Usage Help — USTC Mirror Help Documentation
- Gentoo Portage Mirror Usage Help — USTC Mirror Help Documentation
Just set up these two mirror addresses according to the USTC help guide~
Then copy the DNS information:
root # cp --dereference /etc/resolv.conf /mnt/gentoo/etc/Mount Necessary Filesystems
Pay attention here—I need to run several commands.
Why?
The official explanation:
In a moment, the Linux root will be changed to the new location. To ensure the new environment works correctly, we need to make sure some filesystems are available.
The filesystems that need to be provided are:
- /proc/: a pseudo-filesystem (appearing as regular files but generated in real-time) that exposes some environment information from the Linux kernel
- /sys/: a pseudo-filesystem, like /proc/, but more structured
- /dev/: a regular filesystem containing all device files, partly managed by the Linux device manager (usually udev)
/proc/ will be mounted at /mnt/gentoo/proc/, while the other two are bind mounts. In practice, /mnt/gentoo/sys/ is actually /sys/ (it’s just a second entry point to the same filesystem).
Now execute the following commands in order:
root # mount --types proc /proc /mnt/gentoo/proc
root # mount --rbind /sys /mnt/gentoo/sys
root # mount --make-rslave /mnt/gentoo/sys
root # mount --rbind /dev /mnt/gentoo/dev
root # mount --make-rslave /mnt/gentoo/dev
However, that’s not all.

So, we also need to add these three:
root # test -L /dev/shm && rm /dev/shm && mkdir /dev/shm
root # mount --types tmpfs --options nosuid,nodev,noexec shm /dev/shm
root # chmod 1777 /dev/shm
Chroot: Enter the New Environment
Once everything is mounted, we can chroot in:
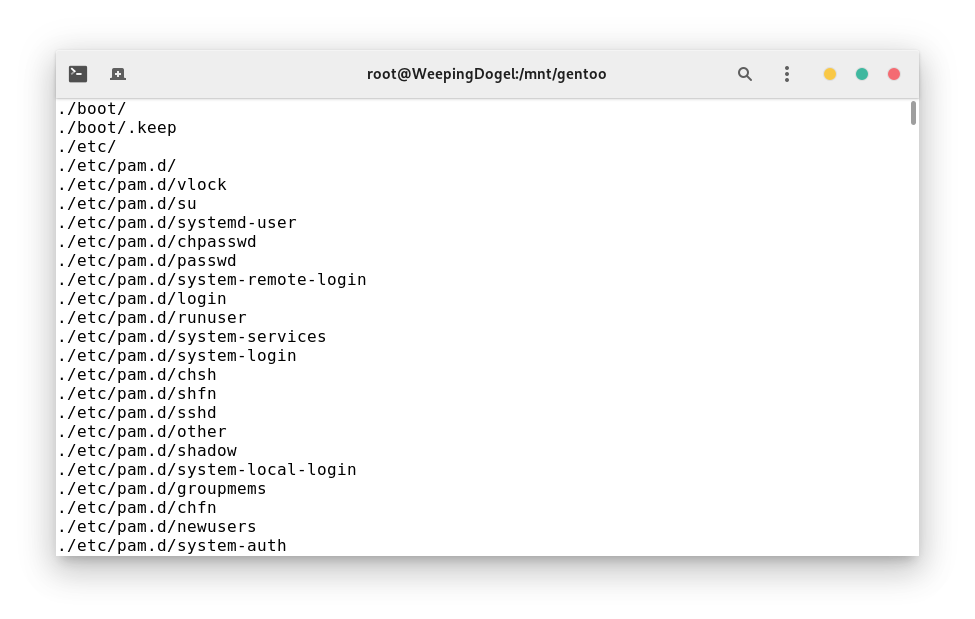
root # chroot /mnt/gentoo /bin/bash root # source /etc/profile root # export PS1="(chroot) ${PS1}"The terminal will look like this:

Mount the Boot Partition
We’ll skip this step, as the final installation target isn’t this machine but the laptop.
We’ll manually install the boot medium later.
Install the Gentoo ebuild Repository Snapshot from the Web
This is essentially equivalent to Arch’s sudo pacman -Syyu.
Enough said, copy and paste:
root # emerge-webrsync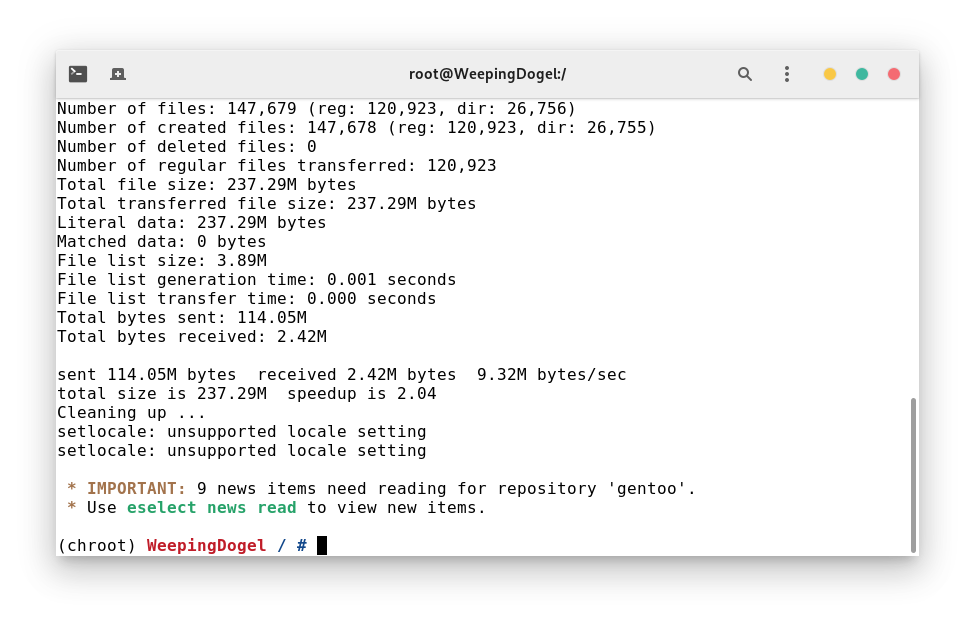
Select a Profile
I feel like I’m just copying wiki content…
A profile is a building block for any Gentoo system. Not only does it specify default values for USE, CFLAGS, and other important variables, but it also locks the package version range for the system. These settings are all maintained by Gentoo’s Portage developers.
# eselect profile listAvailable profile symlink targets:
[1] default/linux/amd64/17.1 *
[2] default/linux/amd64/17.1/desktop
[3] default/linux/amd64/17.1/desktop/gnome
[4] default/linux/amd64/17.1/desktop/kdeThen input the following command:
# eselect profile set [corresponding number]It will actually list many options. We need to select the version containing desktop/system.
Set Timezone
Here, I’ll just use Arch’s method:
# ln -sf /usr/share/zoneinfo/Region/City /etc/localtimeFor my situation, I should write:
# ln -sf /usr/share/zoneinfo/Asia/Shanghai /etc/localtimeThen run hwclock to generate /etc/adjtime:
# hwclock --systohcSet USE Flags
For Gentoo, USE flags are essential. Before compilation, we need to set the global USE flags:
# vim /etc/portage/make.confUSE="alsa udev dbus icu systemd gles2 sound video intel -kde tiff x265"
VIDEO_CARDS="intel"Update the @world Set
This is similar to Arch’s “rolling update”, but it will be a long process.
# emerge --ask --verbose --update --deep --newuse @worldAdditionally, this command is used to dynamically adjust system functionality after changing USE flags.
Configure Locale
I’m tired, refer to the Installation Guide - ArchWiki.
Configure the Kernel
Hmph, do you think I’m dumb enough to compile for 8 hours again? No! This time I’m choosing the binary kernel!
# emerge --ask sys-kernel/installkernel-systemd-bootSaves a lot of time.
# emerge --ask sys-kernel/gentoo-kernel-binAh, I don’t want to write anymore… it’s all copy-paste anyway.
Check it out for yourself:
Install Firmware
Some drivers require additional firmware to be installed on the system before they work. This is often the case for network interfaces, especially wireless network interfaces. In addition, modern video chips from vendors such as AMD, NVIDIA, and Intel often require external firmware files when using open-source drivers. Most firmware is packaged in sys-kernel/linux-firmware.
Drivers for most devices depend on the linux-firmware package.
# emerge --ask sys-kernel/linux-firmwareConfigure fstab
This step is to let the kernel recognize partitions at system startup.
But Gentoo doesn’t seem to support genfstab.
I’ll have to write it manually.
First, get the UUID on the laptop:
ls /dev/disk/by-uuid/ -lThen write the UUID of the / partition’s corresponding partition into the /etc/fstab file in the following format:
# /dev/mmcblk1p2
UUID=xxxxxxx-xxxx-xxxx-xxxx-xxxxxxxxxxxx	/         	xfs       	default,rw,relatime	0 1
Transfer the System to the Laptop via rsync
At this point, insert an ArchISO USB drive into the laptop, boot into the ISO, connect to WiFi, and enable the SSH service.
Next, format its existing partition:
# mkfs.btrfs /dev/mmcblk1p2 -fThen mount it and use rsync to transfer the prepared files:
# mount /dev/mmcblk1p2 /mnt Now, enable the SSH service on the laptop side:
# systemctl start sshdThen use rsync to transfer the compiled files to the laptop’s system partition:
# rsync -aAXHv -P -vi --exclude={"/dev/*","/proc/*","/sys/*","/tmp/*","/run/*","/mnt/*","/media/*","/lost+found"} ./mnt/gentoo/. [email protected]:/mntInstall the Bootloader on the Laptop
This is also a familiar operation.
# grub-install --target=x86_64-efi --efi-directory=/dev/mmcblk1p1 --bootloader-id=GRUB# grub-mkconfig -o /boot/grub/grub.cfgConclusion
After a series of tinkering, this old laptop can finally perform at its maximum potential.
It seems that copying Linux distribution system files to other devices via rsync is feasible.
But it did take quite a while…